One of my favourite data source plugins for Geovonic Connect is the ODATA API plugin. ODATA is like SQL for APIs, providing a standardized way to query and update data over the web, making it easier for different systems to communicate and exchange information. Using Geovonic Connect’s ODATA plugin, it’s super simple to integrate with a wide range of applications such as SharePoint, Dynamics, Assetic and SAP.
In this post, I use this extremely flexible plugin to create an ArcGIS Experience Builder app that will display SharePoint links for documents related to properties selected on the map.
Our Example App
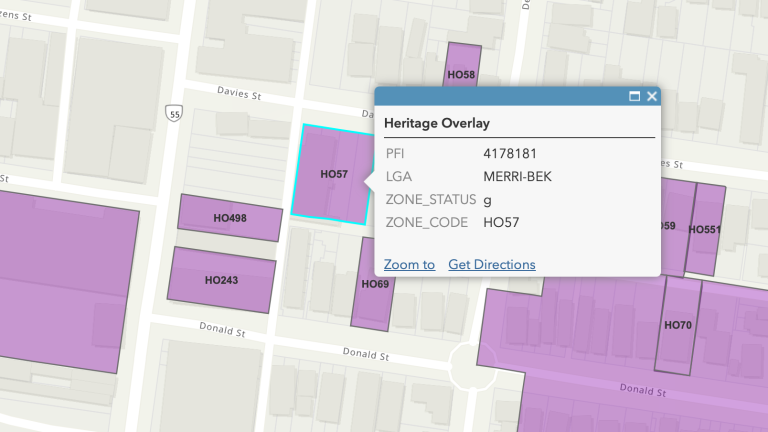
Our example application lets a user click on one or more properties on the map and display related documents from the Victorian Heritage Database stored in SharePoint.
We have a feature layer highlighting all properties with a heritage overlay. Each property includes an attribute (ZONE_CODE) containing the Heritage Overlay ID which we can use to search for the heritage listings.
The files in SharePoint include this ID as part of the naming convention. This relationship between ZONE_CODE on the map features and the ID in the filename allows us to define our Geovonic Connect Layer Link.

Over to the Geovonic Connect Admin Console
Using the Geovonic Connect Admin Console, we’re going to create an OData Data Source definition and a Layer Link relationship. The data source describes how to connect to SharePoint, including the URL and credentials for authentication. The layer link tells Geovonic Connect how to find documents that relate to your map features.
The knowledge base includes detailed information for setting up an OData data source for use with SharePoint. The key step being to create a “New App Registration” for your SharePoint site (you might need help from your IT team to do this).
When setting up the data source, you need to specify the Service Root URL. For SharePoint, this is going to look something like: –
- https://<your_sp_name>.sharepoint.com/sites/<your_site_name>/_api/web
For example:
- https://bousteadgeospatial.sharepoint.com/sites/PropertyInfo/_api/web
The screenshot below shows the Layer Link that provides instructions on how to look up the documents in SharePoint. I’ll step through what each of these fields means.

- Resource URI – selects files that are contained in the HeritageDocs folder. (This is appended to the Service Root URL when making API calls.)
- $filter – only returns files where the file name contains the ID in the ZONE_CODE feature attribute.
- $select – restricts the fields returned from the API to only have the file name (Name) and the URL to open the file (ListItemAllFields/ServerRedirectedEmbedUrl).
- $top – return at most three files for each selected map feature.
- $orderby – when returning multiple files, make sure that we have the three most recently updated files.
- $expand – Include ListItemAllFields so that the API will return the URL to open the file.
For detailed information on making OData queries against SharePoint, check out the documentation on the Microsoft Learn site.
Adding the Widget to ArcGIS Experience Builder
Before building our app, we need to make sure the Geovonic Connect widget is available in your ArcGIS Experience Builder environment.

If you’re using ArcGIS Enterprise, this is as simple as clicking “Register automatically” from the Geovonic Connect admin console.
If you’re using ArcGIS Online, you can download the widget bundle from the admin console and then install it into your Experience Builder Developer Edition folder.
Building your ArcGIS Experience Builder App
Now we’re ready for the fun part – building our ArcGIS Experience Builder app!
(This isn’t intended to be a step-by-step guide to building apps with Experience Builder but the video at the end of this post includes a walkthrough of creating an app from scratch which you might find useful.)
First, we need to make sure oour app includes a Map component and that the selected map is using the feature layer we selected when setting up the Layer Link relationship. Then we can add the Geovonic Connect widget to our application.

On the right-hand side is the Geovonic Connect properties panel. This shows the name of the layer we setup in the Layer Link. Clicking on the layer’s name opens some more properties allowing us to further configure how the Geovonic Connect widget will look.
- Feature label – Each feature displayed in the Geovonic Connect widget has a title bar. Use the feature label to choose what is displayed as the title. Clicking on the [+] button allows you to choose from the feature attributes to display.
- Data sources – Each of the layer links defined for this layer will be listed here. They can be turned on and off for this app. Also, we can click on the name to change how it is displayed to our users.
- Attributes – After selecting one of the layer links, the list of available attributes or fields from that layer link is displayed. Again, we can choose which fields to display for our users and rename the fields. We can also reorder the fields by dragging them up and down.
SharePoint returns a set of OData metadata fields for any API calls. You’ll see these listed in the attributes with names such as odata.id, odata.type etc. Be sure to hide these fields to avoid showing these weird fields to your users.
Our app is now ready to test. Put Experience Builder into “Live view” and then use the selection tool to select one or more features and we’ll see the SharePoint data appear in the Geovonic Connect widget.

In this app, I set the Feature Label to display the ZONE_CODE attribute, so we can see each feature in the widget has the ZONE_CODE as its title.
For the Attributes, I chose to hide all the fields except for the file name and the URL to open the document. The URL has been automatically turned into a hyperlink allowing the user to click to open the document.
A full walkthrough of this example app can be seen in the video below. If you’d like to learn more, please check out our help site or get in touch with our team.